Friday, December 16, 2011

A Very Merry KARLAS001 Christmas Tree

Happy Friday everyone! It was rainy and gloomy yesterday and now it's sunny and windy. California weather what are you doing? LOL No matter, I will not let this crazy weather affect my creating mojo. I have a KARLAS001 Etsy project to share. It is this mini Christmas tree that is decorated with KARLAS001 goodies from top to bottom.

I used the 8mm White Pearl Trim Strand as garland. I also draped some Flat Clear/Iridescent Trim from the top hanging to the bottom. As for ornaments, I used the Jo's Shabby Clear Crystals and the Metal Capped Rhinestones. The Metal Capped Rhinestones already had a wire stem attached, so I just trimmed it a bit and bent it to create a hook. I threaded some wire through the Jo's Shabby Crystals and created the hanging hook.

As for the star topper, I went and used two Clear Flowers and adhered them back to back with a glue dot. I then stamped "Season's Greetings on to some vellum and made a cute banner. The only non-KARLAS001 item that I used was a silver glittered star ornament that I had purchased at Michael's. You can view this project on a video that I created here.

Have a great weekend everyone! Good Luck to those braving the shopping malls this weekend!

KARLAS001 Etsy Products (links provided):
Metal Capped Rhinestones
Clear Flowers
Flat Clear/Iridescent Trim
8mm Pearl Strand Trim
Jo's Shabby Clear Crystals
Other Products:
Mini Christmas Tree, Vellum, White Embossing Powder, Heat Gun, Mini Pearls, Christmas Sentiment Stamp, Glue Dots

Thursday, December 15, 2011

Mini Christmas Wreath

Yikes, just ten more days 'til Christmas! Breathe, breathe LOL. Instead of working on presents I decided to work on this mini Christmas wreathe. This is my I Am Roses project for you this evening. The mini wreathe measures approximately 6"x 6". I incorporated a pearl and crystal garland, some clear wheat sprays and a cute little owl charm.
On the top left, I flanked a 1" Red Paper Flower with two 1/2" White Paper Roses. All the flowers used were sprayed with Lindy's Stamp Gang Scintillating Silver Glitz Spritz.

The center flower in the bottom right arrangement is a 2" Red Paper Rose. The two 1 1/4" White Paper Roses are on either side, followed by some 1/4" Mini Red Roses and 1/2" Small White Roses. To add more flowers and more red, I included a trio of Semi Red Open Rose Buds on either end of the arrangement. I wanted to add some green color to the wreathe, so I laid all the flowers on top of Green Daisy Paper Leaves. Underneath all the flowers and leaves, I layered the pearl and crystal garland with the clear wheat sprays. For a more personal touch, I added an owl charm (I adore owls) in the mix of the flowers. You can view my video of the wreath here.

So there is my mini wreath, it's already hanging on my bedroom door. Thanks for stopping by! Also just a reminder to check out the December Color Challenge still going on at the I Am Roses Challenge Blog.

I Am Roses Products (links provided):
ZQL4-1 Green Daisy Paper Leaves
R40-11 2" Red Paper Roses
R2-12 .25" Red Mini Paper Roses
R5-12 1" Red Paper Flowers
R21-1 1.25" White Flowers
T30-101 Semi Red Open Rose Buds
R8-15 .50" White Paper Roses
Other Products:
Twig Wreath, KARLAS001 Etsy Clear Wheat Sprays, Misc. Crystal Garland, Hot Glue Gun, Lindy's Stamp Gang Scintillating Silver, White Seam Binding

Lindy's Stamp Gang: One Day Sale


Secret ONE DAY SALE.... TODAY Dec 15!

20% off all sets!
Starburst Spray, Stain, & Color Shot sets
Moon Shadow Mist & Ink sets
Magical sets
Try Me kits
and all Filagrees

Coupon code: secretsanta
Remember-all US orders over $40 get FREE SHIPPING, always!

Friday, December 9, 2011

Embellishment Tray

Happy Friday everyone! How's the holiday shopping going? Mine? Still going LOL. Here is my I Am Roses project for you today. I turned this plain peat compartment tray, found at my .99 Store, into an embellishment holder. This is a gift that I filled up and created for my sister.

I used some bamboo skewers to hold up the banner with her name spelled out. I flanked both sides of the banner with a 1" White Rose and some S10 Flowers.
Each tray slot was filled with some of my favorite embellishments for her to use. It's a beautiful way to display any goodies and makes for easy access.

I layered some lace trims and wrapped it around the tray. The center flower is a 2" White Rose backed with some Skeleton Leaves, Rose Leaves and some more S10 Flowers. I tied a bow with some white seam binding as well.

On one of the skewers I wrapped a Short White Flower Spray with some lace and seam binding. This is not permanently adhered to the stick so that it too can be used as an embellishment. I love how this turned out and with such little cost. You can view a closer look of my project on my video here. Thanks for stopping by.

One last thing, don't forget to head on over to the I Am Roses Challenge Blog, we are having a Color Challenge going on for the month of December. Have a beautiful weekend!

I Am Roses Products (links provided):
K1-805/Z Small Natural Skeleton Leaves
B0-508 Pale Green Leaves
R77-15 2" White Roses
R5-1 1" White Paper Flowers
S10-15 5/8" Small White Flowers
SP1-151 White Short Flowers Spray
R21-278 1.25" Blue 2 Tone
Other Products:
MME Misc. Paper, Bamboo Skewers, Peat Compartment Tray, Creative Time Build a Banner Kit, Cuttlebug, Hot Glue Gun, Misc. Lace Trim, White Seam Binding, Stickles Platinum, Distress Ink Antique Linen, Misc. Alpha Stamps

Friday, December 2, 2011

Shabby Holiday Stockings

Is everyone ready for the weekend? I wanted to share this project that is easy to create using some Pink Rose trim and Pearl trims from KARLAS001's Etsy. The backing of these stockings are just basic thick cardstock cut into a stocking shape. I cut off the individual roses on the trim to fill out the shape. Instead of using ribbon as the stocking hanger, I opted to use the pearl trims.

These Mini Crystal Clear Butterflykisses Butterflies added a cute touch. Using other trims to decorate the top and some pearl embellishments for the buttons they completed the look.

This is a holiday project that is easy to create as little handmade gifts. You can also use other colored trims that you already have in your stash.

I used the White Flat Back Pearl Trim for these two stockings.

For this one, I used the Pink Flat Back Pearl Trim to coordinate with this light pink rose trim.
On this stocking, it was initially a cream rose trim but I had dyed it with my Lindy's Stamp Gang Starburst Spray in Cadbury Milk Chocolate. The trim I chose to go with this brown color was the Bronze Pearl Strand Trim.

I truly love how these stockings turned out and I hope my scrappy friends like them. To watch a tutorial on how you can make a similar project like these, you can view my video here. As always thanks for taking the time to stop by. Have a great weekend!

KARLAS001 Etsy Products (links provided):
White Flat Back Pearl Trim
Pink Flat Back Pearl Trim
Bronze Pearl Strand
Mini Crystal Clear Butterflykisses Butterflies
Nancy's Pink Rose Trim
Pink Loopy Trim
Other Products:
MME Festive & Frost 12x12 Paper Pad, Hand cut stocking template, Misc. Trims, Pearl Embellishments, Lindy's Stamp Gang Starburst Cadbury Milk Chocolate

Thursday, December 1, 2011

2011 December I Am Roses Color Challenge


Hi everyone! It's December! Yikes, what happened to Jan-Nov, LOL. Are you ready for our first I Am Roses Color Challenge? It’s happening right now. Here’s your chance to win some of the fabulous flowers that our Design Team uses. Head on over to the I Am Roses Challenge Blog for more details and challenge rules.

Here is my project that I created for this month's challenge. I recently got my hands on some glassine bags (baker's bags/favor bags) and decided to jazz them up.

I love how they turned out. Does it even really matter what's inside? The packaging is so cute! I used various sizes of roses and a large gardenia. For a more organic look, I used some jute rope instead of ribbon.

The Christmas tree images were stamped on some kraft paper and embossed with white embossing powder. Some of the flowers were sprayed with Lindy's Stamp Gang Royal Peacock Fire Glitz Spritz for that added shimmer.

So that is my project to help inspire you. I hope it worked =) Good luck on the challenge!


I Am Roses Products (links provided):
GB4-607 - Mixed Blue Gardenia
R1-170 Mini Blue Paper Roses
R2-15 Mini White Paper Roses
R2-40 Mini Brown Paper Roses
R8-15 1/2" White Paper Roses
R21-278 1.25" Blue 2 Tone
ZQL0-721 Small Soft Green 2 Tone Maple Leaves
Other Products:
MME Festive & Frost 12x12 Paper Pad, MME Christmas Stamps, SU! Kraft Cardstock, Glassine Bags, Jute Rope, White Embossing Powder, Heat Gun, Misc. White Scallop Trim, SU! 1 3/4" Circle Punch, SU! 1 1/8" Circle Punch, Lindy's Stamp Gang Royal Peacock Fire Glitz Spritz

Thursday, November 24, 2011

Black Friday Sale @Lindy's Stamp Gang

Let the madness begin! Lindy's Stamp Gang is having a huge sale! If you loved all the shimmery goodness on my projects don't miss out on the fabulous deals going on.

Thankful

Happy Thanksgiving everyone! I just wanted to thank all of you for your continued support on my blog and YouTube Channel. I am very thankful to be a part of this crafting community.

Thanksgiving is very special to me because it is my FAVORITE MEAL of the year! LOL, not food but MEAL hahaha. Thank you to my mom and all the moms out there who make this happen!!

Enjoy!
~Jo

Monday, November 21, 2011

Bitten

Good afternoon everyone. I have an I Am Roses project to share today. It is a gift box and a card. This was a hostess gift for my friend Thai (YouTube: EvilScrapper). She was kind enough to open up her place for me to stay the night after a birthday crop that we went to.

As you can see the theme I chose was Twilight. Go Team Edward!! LOL. The stamp I used was from The Greeting Farm, a Edward digi stamp. I made him all sparkly with some awesome glitter. The images of the apple, the moon and the word Bitten are all from the stack DCWV Immortal Love, perfect! I thought it was cute to add the Red Semi Open Rose bud to Edward =)

I made the coordinating gift box to go with the card. You can watch my tutorial video here, showing how you can make a similar box with any design paper of your choosing. I added more of the rose buds in front, as well as the 1/2" White Flowers and a Black Rose from a Random Mixed Sizes of Black Tones.
I wanted to personalize the lid, so I used some die cuts to spell out her name. The leaves and the letters were sprayed with a gorgeous black from Lindy's Stamp Gang, Midnight Rendezvous Black. I added some bling and more flowers on the top left corner. For more details you can view my video of this project here. Thanks for stopping by! Enjoy your short work week (for those in the U.S)!

I Am Roses Products (links provided):
ZM-78 Random Mixed Sizes Red Tone & White
ZM-274 Random Mixed Sizes of Black Tone
R8-15 1/2" White Paper Roses
T30-101 Semi Open Red Rose Buds
Other Products:
DCWV Immortal Stack, The Greeting Farm Edward Digi Stamp, QK Mademoiselle Alpha Die Cuts, Cuttlebug, Want2Scrap Black Flourish Bling, Lace Trim, SU! Dazzling Diamonds Glitter, Misc. Leaves, Lindy's Stamp Gang Starburst Midnight Rendezvous Raven, Silver Brads

Sunday, November 6, 2011

I Am Roses "Fall into Autumn" Blog Hop Winner

Happy Sunday everyone! We had an AMAZING response for the I Am Roses “Fall into Autumn” Blog Hop. We wanted to thank you for participating in the hop and showing your love & support for the projects the design team created just for you.

Are you ready to find out where the secret blog candy was hidden and who the winner is?

Head on over to the I Am Roses Challenge Blog where it’s all revealed.


Thanks again and see you over at the I Am Roses Design Team YouTube Channel , where myself and the other designers will continue to share unique projects to keep you inspired. ♡

Hugs,
Jo

Thursday, November 3, 2011

Merriest Wishes

Hi everyone Happy Thursday evening or Friday! I created this I Am Roses holiday gift box to share with you guys. It was really simple to make using designer paper. You can watch the tutorial here. All the edges were inked with Walnut Stain Distress Ink. The sentiment "Merriest Wishes" is from a Hero Arts stamp set. I framed it with the Classic Ovals Small and Labels Four dies from Spellbinders. I then used dimensional pop dots to raise it up and it allows the seam binding to run through the back. Some 1/4" Red & Brown Mini Paper Roses and 1/2" White Paper Roses accent the corners.

I am in love with this new flower to the I Am Roses Site, Big Red Gardenia. I used it as the centerpiece in the floral arrangement on the lid. One word, gorgeous! I first placed some brown seam binding and then laid some Skeleton Leaves as the base. I randomly placed White Cherry Blossoms, 1" White Paper Roses, Brown Paper Roses and some Mini Red Paper Roses all around the base of the red gardenia.

The box is filled with yummy goodies for my friend for a holiday crop party. I can't wait for her to see it =).

I hope you've enjoyed my gift box and tutorial video. Have a fabulous Friday and weekend!

I Am Roses Products (links provided):
S3-152 White Cherry Blossoms
K1-805/Z Small Natural Skeleton Leaves
Special 1 Big Red Gardenia
R2-12 Mini Red Paper Roses
R2-40 Mini Brown Paper Roses
ZM-827 Random Mix Sizes of Classic Brown Tone
R5-1 1" White Paper Flowers
R8-15 1/2" White Paper Roses
Other Products:
MME Festive & Frost 12x12 Paper Pad, Rich Cocoa Memento Ink, Hero Arts Holiday Wishes Stamp Set, Spellbinders Labels Four, Spellbinders Ovals Small, Cuttlebug, Walnut Stain Distress Ink, Brown Seam Binding, Dimensional Foam Pop Dots, Lace Trim, Small Brown Brads

Tuesday, November 1, 2011

I Am Roses "Fall into Autumn" 2011 Blog Hop (CLOSED)

WELCOME! Thank you all for joining the I Am Roses Fall into Autumn 2011 Blog Hop! The Design Team is thrilled to share our special projects with you showcasing some of the latest flowers and old favorites. If you are coming first to my blog, you will want to head to the I Am Roses Challenge Blog to start at the beginning.

We also wanted to thank you for all the support and wonderful comments on our YouTube Channel iamrosesdt; we have reached over 1,400 subscribers! What better way to celebrate this FALL season is with a PRIZE!

Here’s how for your chance to win:

- Hop along to each of the design team member's blogs and be sure to comment on their individual Fall into Autumn 2011 Blog Hop post.

- There is 1 hidden blog candy prize up for grabs in one of our DT member’s blogs!

- Be sure to subscribe/follow the new I Am Roses Challenge Blog.

- Commenting along the way highly increases your chance of winning the prize package.

- Comments will be closed on Friday Nov. 4th 9pm PST

- We will be randomly selecting 1 winner from the comments on one of the blogs and will announce the winner on Sunday, Nov. 6th!

As you hop along be sure to subscribe/follow to the individual design team member's blogs so you don't miss out on the winner announcement!

Now on to what I created…

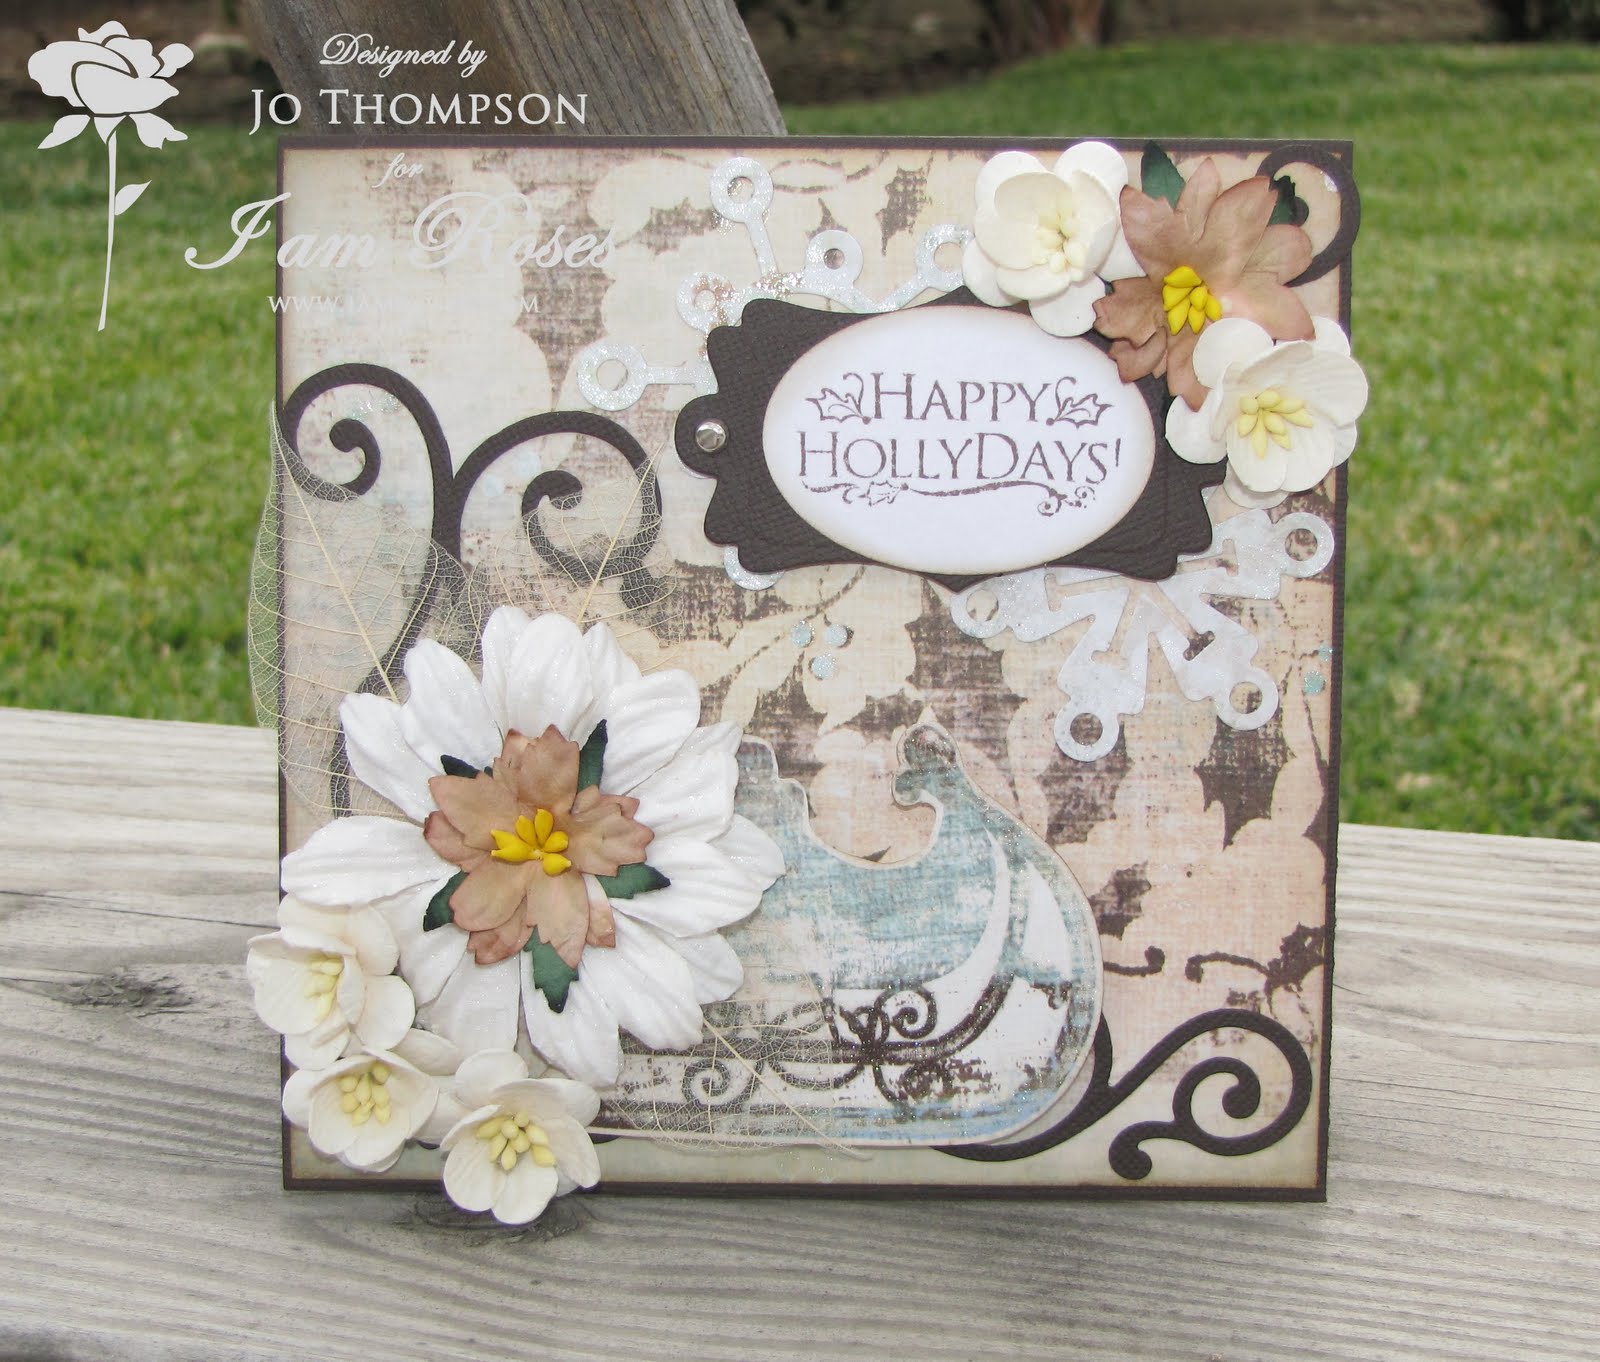
Our challenge for this hop was to create a Fall themed tag using I Am Roses flowers. This is my tag for you guys today. The tag measures 3 1/8" x 6 1/8". I am still trying to use my paper stash and this one is My Mind's Eye Bohemian collection. The stamp set I used is from Inkadinkadoo Autumn Foliage. The sentiment is embossed with gold embossing powder. The two frames are from Tattered Angels, the square frame is sprayed with Dark Chocolate Truffle Starburst from Lindy's Stamp Gang and the ornate frame was colored with some gold glitter nail polish, yes I used nail polish LOL.

I distressed the edges of the tag with Spiced Marmalade Distress Ink. The orange tangerine cherry blossoms were perfect for my Fall theme.

I layered some green daisy leaves with some gold metal flat leaves from Lindy's Stamp Gang. I just love the white gardenia as the main floral focal point. To finish off the tag I used some fibers in lieu of ribbon. So there is my tag and I hope you enjoyed it. Links of the flowers will be posted below.

Next Design Team member up is Joy! I’m sure she has something AMAZING to share with you!

In case you get lost along the way, here is a list of the I Am Roses design team members hopping today:

Arlene: www.butterflykisseswithlove.blogspot.com

Amy: www.myteddyboo.blogspot.com/

Andrea: www.whimsycrafts.blogspot.com/

Becca: www.beccascraftycorner.blogspot.com/

Bona: www.keeponscrappin.blogspot.com

Cindy: www.cynthialoowho.blogspot.com

Jo: www.paperdrama.blogspot.com (that's me)

Joy: www.artangelsdesigns.blogspot.com

Limor: www.chicscrapbookdesigns.blogspot.com/

Rina: www.scrapmusubi.blogspot.com

Yvonne: www.scrappingisbliss.blogspot.com

Also don't forget to Subscribe/Follow the new I Am Roses Challenge Blog to qualify to win!

Before I go, here is a preview of the I Am Roses blog candy that is up for grabs:

Thanks for coming by and playing along! Good Luck!

I Am Roses Products Used (links provided):
GB4 Big White Gardenias
S3-131 Orange Tangerine Cherry Blossoms
S3-531 Light Orange Tangerine Cherry Blossoms
L4-2 Green Daisy Paper Leaves (sold out)
Other Products:
MME Bohemian Paper, Inkadinkadoo Autumn Foliage Stamp Set, Spiced Marmalade Distress Ink, Antique Gold XL Eyelet, Crop-a-dile, Fibers, TA Frames, Lindy's Stamp Gang Metal Leaves, Lindy's Stamp Gang Starburst Dark Chocolate Truffle, Gold Glitter Nail Polish, Gold Embossing Powder, Heat Gun

Wednesday, October 26, 2011

Happy Hollydays!

Happy Wednesday! I created an I Am Roses Christmas card today for you guys. I'm using more of the MME Festive & Frost paper stack that I purchased last year. I am determined to use up this 12x12 paper pad this year, no more hoarding! LOL. The stamp set I used is from Inkadinkadoo Holiday Filigree. To punch out the sentiment I used the large oval punch from Stampin' Up!. Using the Grommet Tags from Spellbinders, I cut some brown cardstock and layered the sentiment over that and added some silver brads. All the papers were edged with Walnut Stain Distress Ink.

Out of some of the pattern paper I used my Quickutz Snowflakes die and placed them in the background. The White Puffy Daisies and the snowflakes were sprayed with my Lindy's Stamp Gang Glitz Spritz in Scintillating Silver. I used these Small Brown Poinsettias for the card to match the brown tones in the pattern paper. To make the card more lush, I added some White Cherry Blossoms.

On the corner of the card I cut out this sled from the pattern paper. I then layered some of the Natural Skeleton Leaves for the flowers to lay on. So there is my card and I hope you guys enjoy the rest of your day. Thanks for stopping by!

I Am Roses Products (links provided):
S3-152 White Cherry Blossoms
K1-805/Z Small Natural Skeleton Leaves
C4 Sm. Brown Poinsettia
PS-15 White Puffy Daisies (Sold Out)
Other Products:
Brown Cardstock, Inkadinkadoo Holiday Filigree, MME Festive & Frost 12x12 Paper Pad, Rich Cocoa Memento Ink, QK Snowflakes (REV-0069), QK Flourishes (REV-0024), Cuttlebug, Lindy's Stamp Gang Glitz Spritz Scintillating Silver, Spellbinder's Grommet Tags, SU! Oval Punch, Silver Brads, Walnut Stain Distress Ink