Pages

Monday, November 23, 2020

25 Days of Christmas Tags 2020

Welcome to the 25 Days of Christmas Tags hosted by Tracey at
http://inmycreativeopinion.blogspot.ca/. Please visit her blog for all the details.

Here are the amazing Sponsors:

Thank you for joining me today. My tags are brought to you by:


I created these ornament tags using the Hello Sunshine Stencils 360°™ along with the Stencils 360°™ Starter tool. I used various stamp sets from Penguin Palace to create the mini scenes in each ornament. I filled up the shakers with winter/holiday sequin and sprinkles.


Come join us over at the Penguin Palace Instagram
Thanks for taking the time to stop by!


Other Products:
Distress Ink - Fired Brick
Distress Oxide Ink - Mowed Lawn
Copic Markers
Circle Nesting Dies


Friday, November 20, 2020

CLUB La-La Land Crafts November Kit Reveal

 Hi everyone! Today I am revealing the Club La-La Land Crafts November 2020 Kit! It's time to start creating our winter cards.

                 (*images are skewed to prevent piracy)

If you’re new to Club La-La Land Crafts, it's a monthly subscription only kit with exclusive products each month. Also included are project tutorials from the Design Team Members specific to the current kit. There are three options available for purchase:

Product Kit
: Stamps and Die Kit - $39.99

Stamp Kit: Stamps Only - $19.99

Die Kit: Dies Only - $29.99

For more information click HERE.
Last day to Sign-up is November 3oth.

My first card includes images from both stamp sets and all the dies included in this kit. Here I created a Winter hillside scene with Marci with Sled and two bears from the Bear Hugs Stamp Sets. Both of the cards I created use the Blue Christmas Paper Pack.

All images are colored with Copic markers. The Winter Houses were cut from red and green cardstock. The card used foam adhesive tape to add dimension to the images and Snow Banks. The Fence on a Hill is tucked in behind a snow bank. The sentiment I used is "may your days be BEARY & BRIGHT".

Copic Markers

Marci:

Skin - E00, E11, BV00, R81, R27

Hair - C3, C5, C7

Hat - R22, R24, R27, R39

Hat Trim/Pom Pom - YG03, YG63, YG67

Coat - R22, R24, R27, R39

Coat Cuffs - C1, C3

Scarf/Gloves- YG03, YG63, YG67

Leggings - C3, C5,C7

Boots - R22, R24, R27, R39, C3, C5, C7

Boots Trim - C1, C3

Sled - W1, W3, W5, W7

Sled Blades - R22, R24, R27

Bear (1):

Fur - C1, C3, C5, B0000, R81

Hat - YG03, YG63, YG67

Hat Trim - R22, R24, R27, R39

Hat Pom Pom - C1, C3

Scarf - R22, R24, R27, R39

Bear (2):

Fur - C1, C3, C5, B0000, R81

Hat - R22, R24, R27, R39

Hat Trim - C1, C3

Hat Pom Pom - C1, C3

Scarf - YG03, YG63, YG67


Additional LLLC Products Used:

Blue Christmas Paper Pack

Here is my second card using Marci with Sled and a bear from Bear Hugs Stamp Set. 

Marci may look a bit different because I decided to try something new with her hair. This was the first time for me to try curly hair without any guide from the stamp image. I love how she turned out. I created a shaker tag card. I used the Large Stitched Tags Die to create my shaker tag. The Winter scene inside includes the Winter Houses and Snow Banks dies. 

Copic Markers

Marci:

Skin - E00, E11, E13, R83, R27

Hair - E71, E74, E79, E37

Hat/Pom Pom - B32, B34, B37

Hat Trim - B0000, B00

Coat/Gloves - B32, B34, B37

Coat Cuffs - B0000, B00

Scarf - R22, R24, R27, R39

Leggings - C3, C5,C7

Boots - R22, R24, R27, R39, C3, C5, C7

Boots Trim - B0000, B00

Sled - R22, R24, R27, R39

Sled Blades - C3, C5, C7

Bear:

Fur - C1, C3, C5, B0000, R81, E93

Hat - B32, B34, B37

Hat Trim/Pom Pom - B0000, B00

Scarf - B32, B34, B37


Additional LLLC Products Used:

Large Stitched Tags Die
Build-a-Frame Small Stitched Die
Blue Christmas Paper Pack

For a close-up look at this kit and my projects, please visit my YouTube Channel HERE
Come join us over on the Facebook Community CLUB La-La Land Crafts Group and La-La Lands Crafts Group. Thanks for stopping by!

Wednesday, November 11, 2020

Penguin Palace - Kindness Comes From Your Heart

 Happy Wednesday! Today's card is for Penguin Palace Stamps using the Rain of Hearts Penguin Perfect Patterns Stencil. 

I created this one layer CAS card. I went with a Fall color palette. The stamp and sentiment coordinated well with the heart stencil pattern. I hope you give this card a try. It is easy to recreate for all those thank you cards you want to send this season.


Here is a process video over on The Penguin Palace Stamps YouTube Channel:
Come join us over at the Penguin Palace Instagram
Thanks for taking the time to stop by!


Other Products:
Distress Oxide Ink - Fossilized Amber
Distress Oxide Ink - Dried Marigold
Distress Ink - Spiced Marmalade
Distress Oxide Ink - Fired Brick
Mama Elephant Pigment Ink - Apple

Saturday, November 7, 2020

Kat Scrappiness November Release - Day 1

 Hi everyone!  Get ready for the holidays. Here are some cards featuring products from the

 Kat Scrappiness November Release. 


This card is dedicated to all the Disney lovers out there. The brand new Christmas Shaker Ornament Dies are fabulous. I used the circle ornament to mimic Mickey Mouse's iconic head. This coordinated perfectly with the Magical Holiday Sprinkles, which include Mickey shaped heads in white and red. The paper is part of the release as well, Cuppa Christmas Slimline Paper Pad, perfect for slimline cards and as well as other smaller sized cards.


Here is the video over at the Kat Scrappiness YouTube Channel 

Next card I have for you is using the Forest For The Trees Slimline Die. This makes a scenic woodland backdrop for your cards. The gorgeous paper is from Sugar Plum Fairies Slimline Paper Pad and coordinates well with the Sugar Plum Fairies Sequin Mix.


The colored trees are from the Merry Critters Stamp Set. You'll also notice some Kat Scrappiness Tools featured in the photos. There is an Embellishment Tool, an Embellishment Tray and the Sequin Organizer. All products used are listed below.


Stay tuned for this video to be live over at the Kat Scrappiness YouTube Channel.

Thanks for stopping by! I hope you are enjoying the release and that this helps you get ahead on your holiday projects!


Thursday, November 5, 2020

Kat Scrappiness & Ink On 3 Harvest Hop


Welcome to the “Happy Harvest Hop from Kat Scrappiness & Ink on 3!” We are thrilled you could join us on this blog & Instagram hop celebration! We will be sharing darling fall cards featuring Kat Scrappiness amazing dies and sprinkles and Ink On 3’s fabulous inks and darling fall stamps. Come hop with us for inspiration and of course prizes!

The hops November 5th at 10am CST and will end on November 8th at midnight. We will have 4 x $15 winners!! 2 from randomly chosen blog posts and 2 from randomly chosen Instagrams so the more you comment the better chance you have.

To participate in the hop giveaway, simply leave a comment on each blog post, follow each DT on Instagram, comment and tag your friends. The more you comment the more chances of winning. Bonus entries for following our stores on all our social media below:

The winners will be announced on the Ink on 3 and Kat Scrappiness blogs & Instagrams on November 10th. You will need to contact us to claim your prize. You can subscribe to our blogs for a notification email on any new blog posts. You will have 7 days to claim your prize.

Thank you for hopping with us and supporting our small businesses!
Hop Order:

Meghan Kennihan @MadeByMeghanK

Kathy Schweinfurth @stampinkathy4

Jo Thompson @thompson_jo (YOU are HERE) Priscilla Joseph @nubblelightdesigns  (NEXT)

Jenny Hall    @thejennyhalldesign

Erica A-B  @erica_cacacraft

Lynnea Hollendonner @lynneahollendonner

BromeroCards @bromerocards  

Ceal Pritchett  @cealp

Ink On 3 @inkon3


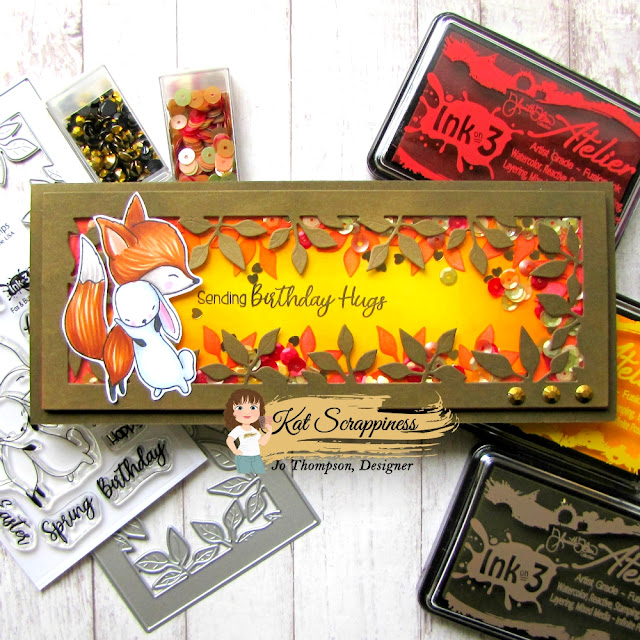
I created this slimline card using the Ink On 3 Fox & Bunny Hugs Stamp Set. The frame of the shaker portion is from Kat Scrappiness Foliage Frame Slimline Die. The kraft cardstock is inked up with the Atelier Twiggy Brown Fusion Ink Pad. I combined the other two colors Bee Sting Yellow and Marilyn Red to create that glow and blended background. I love the autumnal colors. Great color scheme to celebrate a birthday this season. The shaker window is filled with Kat Scrappiness Harvest Sequin Mix and 4mm Gold Heart Sequins. Lastly, I laid down Kat Scrappiness Gold Jewels on the bottom right corner as an added embellishment.


Wednesday, November 4, 2020

Penguin Palace - Never Lose Hope

 Happy Wednesday! Today's card is for Penguin Palace Stamps using the Summer Blossom Stencils 360°™  with the Stencils 360°™.


I've been on a sunflower kick lately. One look at this Summer Blossom Stencil and I thought, hey that can be a sunflower LOL. So this is what I created. Using three ink colors (Walnut Stain, Spiced Marmalade, Fossilized Amber) this is the ink blend I came up with. On the Stencils 360°™ I followed the triangle symbol guide (45° Interval), this is the pattern that was created. I splattered a brown colored spray to add some interest to the background. Using the Dots Meet Dashes Large Rectangles Die, I cut the pattern off centered to the right.

The flower shaker part of the card was created using a mix of the Words From The Heart (Chapters 1 & 2) and the Warmest Wishes and Heartfelt Notes Coordinating Penguin Perfect Cuts to create the frame. The Never Lose Hope Shadow Die was cut using black cardstock. I wanted the sentiment to pop. The shaker is filled with round brown sequins. Last embellishment is this heart sprinkle centered on the heart.


Here is a process video over on The Penguin Palace Stamps YouTube Channel:
Come join us over at the Penguin Palace Instagram
Thanks for taking the time to stop by!


Other Products:
Distress Oxide Ink - Walnut Stain
Distress Oxide Ink - Fossilized Amber
Distress Ink - Spiced Marmalade
Kat Scrappiness Red Heart Sprinkles

Tuesday, November 3, 2020

Club La-La Land Crafts October Kit Inspiration

Hi everyone, welcome back! Today I'm sharing more projects using the October 2020 Kit from Club La-La Land Crafts!

  The first card used both stamp sets (Marci with Apples/The Apple of my Pie). All dies were used minus the large apple (Apple) die.


I sat at my desk and just started playing around with the cut die cut pieces of the dies and came up with this sunflower. After several goes with the die in my die-cutting machine, the end result was magnificent. The stem of the flower was made using the two hill dies in Double Stitched Hills Border Die. The background was created using the Daisies on my Mind Layering Stencil. Marci is placed on top of the Apple Orchard Die cut and holds one of the cute hedgehogs from The Apple of my Pie Stamp Set. 

All images are colored with Copic markers and the sunflower center and leaves were inked up with Distress Oxide Inks (Walnut Stain, Fossilized Amber, Dried Marigold). I used the die Apple Pie to mimic the center of the sunflower and layered a Double Stitched Circles Die beneath it. The sentiment "so thankful for you" is from Marci with Apples Stamp Set and it is on one side of the Build-a-Frame Stitched Small Die. Lastly, this whole scene is laid out on two Scalloped Rectangle Dies.


Copic Markers
Marci:
Skin - E00, E11, BV00, R81, R27
Hair - C3, C5, C7
Hat/Boots - YG03, YG63, YG67
Top - YG03, YG63, YG67, E29, E37, E33, E31
Leggings - E31, E33, R24
Basket - E31, E33, E37, E29
Apples - R22, R24, R27, R39, YG03
Hedgehog:
Skin - E31, E33, E37, E94, R83
Hair - E71, E74, E79
Apple:
Green Leaves - YG03, YG63, YG67
Apple Orchard:
Fence - E79

Additional LLLC Products Used:

For my second card, I can't help but use both stamp sets from the kit, they go so well together. This time around, every die included in this kit was used.


So my sunflower creation makes a cameo, this time it represents the sun rising/setting. The Apple Pie die is used for the center of the flower. Again, I chose to use the Daisies on my Mind Layering Stencil for my background. The Apple Orchard Die was cut three times and layered at different heights. The little apple mini die in the Apple Orchard Die was used on the trees. The Apple Die peeks out from one of the hills. The sentiment "I love you to my core" is from The Apple of my Pie Stamp Set and is on one of the side dies from Build-a-Frame Stitched Small Die

The images are colored with Copic markers and the sunflower die cuts were inked up with Distress Oxide Inks (Walnut Stain, Fossilized Amber, Dried Marigold). I used a white gel pen to highlight the Apple Die. I used two of the four hedgehogs in The Apple of my Pie Stamp Set that are holding apples. 


Copic Markers
Marci:
Skin - E00, E11, BV00, R81, R27
Hair - E71, E74, E79
Hat/Boots - E31, E33, E37, E29
Top - BG13, BG15, BG49
Leggings/Basket - E71, E74, E79
Basket - E31, E33, E37, E29
Apples - R22, R24, R27, R39, YG03
Hedgehogs:
Skin - E31, E33, E37, E94, R83
Hair - E71, E74, E79
Apple:
Apple - R24, R27
Stem - E37
Green Leaves - YG93, YG95, YG97
Apple Orchard:
Fence - E79
Trees - YG93, YG95, YG97
Apples - R27
Hillside - YG93, YG95

Additional LLLC Products Used:

If you missed your chance to sign up for this kit, don't fret. As a Club Subscriber perk, past month kits eventually get released and are available for purchase (after a two-month subscription). There are three options available for purchase:

Product Kit: Stamps and Die Kit - $39.99
Stamp Kit: Stamps Only - $19.99
Die Kit: Dies Only - $29.99

For more information click HERE.

Come join us over on the Facebook Community CLUB La-La Land Crafts Group and La-La Lands Crafts Group. Thanks for stopping by!